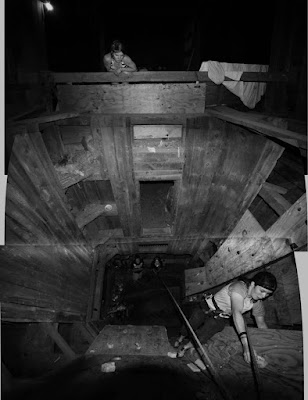
below is the original digital image collage, converted to grayscale, but otherwise untouched/unadjusted

photopolymer graveur (aquatint, "safe" etching, whatever you call it) will drop out values above 80% and below 20%. In other words at those points the value will go right to black or white. So, the grayscale really only runs between the two, in the middle ground, and is not subtle at all towards the end of the scale. (I have been told this is mostly true for the original Photo Graveur, and had to be addressed. Difference in this process is that most of the adjustment is on the computer and not the development process)
I have seen a couple of curves claiming to solve this issue, but they (in my opinion) only work at the cost of some variety in the middle of the scale. I suspect this is because they are trying to bring up values that are not there.
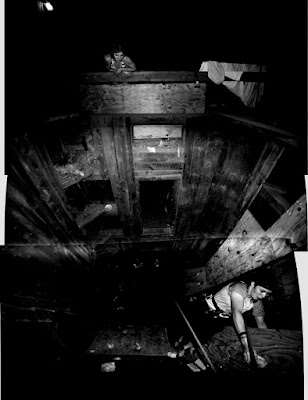
The best thing I have discovered (to date) is the simple idea of getting a reliable preview. No matter how much you adjust your image, it is difficult to guess how much information will be lost. So, when you think you are ready to go, I'd suggest adding on more adjustment layer, and moving the sliders over from 0 to 20, and from 100 to 80. Check out the results...
below is the adjusted image: it is the first (above) image, with the curves adjusted at 20 and 80 as a way for me to preview my results from the polymer plate.

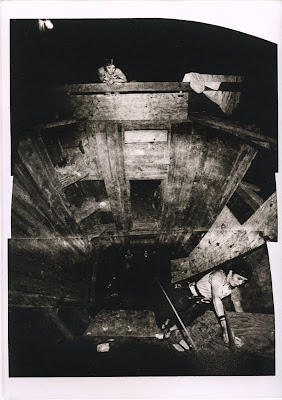
below is the actual printed image from a KM73 photopolymer plate.
There is a bit of information loss in the scan, but this is a pretty representation of what it looks like.

To clarify:
Top image is the original, and the one I printed on a high quality transparency (Pictorico), and used to expose the KM73 photopolymer plate.
Middle image is the top image, with an adjustment layer (Curves) over it, sliders moved from 0 to 20 and from 100 to 80 to get a preview of how the image will look from the KM73 plate, knowing that information is lost above 80 and below 20. It is only a way to get a sort of soft proof, to make sure I am on the right track.
No matter how I adjust the image before printing to the transparency, I want to do this preview before printing to see if it will be satisfactory.
BE SURE TO UNDO THIS STEP BEFORE YOU PRINT!!! It is a preview technique only.
Bottom image is printed from the KM73 polymergraveur plate onto Rives BFK white paper with Graphic Chemical Vine Black etching ink.
For those who have yet to discover this process (or have only just heard of it), here is a nice overview by someone else
http://www.alternativephotography.com/wp/processes/photogravure/photo-polymer-gravure-the-whys